|
|
||||||
|
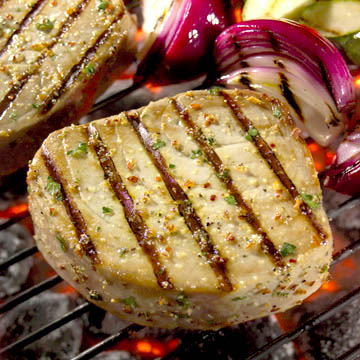
Studio Photography lighting special effectsSpecial effects photography - How to photograph food on a grill (special effects with studio photography lighting). Professional food and studio photographer explains the studio lighting special effects in the food photograph above.
So here’s the project. We’re to photograph a tuna steak on a grill for a local grocery store chain direct mail promotion. This is a fun project. If you’re doing food photography for packaging or advertising, you sometimes have very little creative license, but on these kind of editorial jobs, the object is to simply make appealing photos marketing the chosen subject matter. In other words, make pretty pictures. The client simply want us to promote grilling their Tuna.
Here’s how we did the studio photography special effect.Here’s the part that you can’t tell anyone. How do you think we keep the crew from asphyxiating from the grill fumes? Right, we fake it. Step one. Sawzall off the bottom of the grill. (If you’re doing this at home, I suggest that you either consult with your wife first, or borrow the neighbor’s grill) Set modified grill on top of a glass or Plexiglas surface and supported it from the two ends, so that it is elevated off the ground and you have enough room underneath the glass to place an upside down light box. On top of the glass table surface, we placed a piece of frosted plex and on top of that we placed a piece of orange gel. To simulate burning charcoal brickets, we used new charcoal brickets with "fire place" ash (stylist supplied fire place ash, is preferred, so that I don’t have to remember to bring in my own) sprinkled over and between the brickets. We used a stick to make spaces in the ash where we wanted the "fire" (gelled light from down below) to show through. The ash dirties the new charcoal to make it look like it’s already half burned. I know of some photographers that will use baby powder sprinkled over the charcoal to give a similar effect. You will need to experiment with the intensity of the "fire light" to get the desired brightness.
If you use white cards or other types of reflectors, the light is much less controllable, and just sort of washes out large areas instead of small specific areas. The intensity of the lighting was very low to create a minimum depth of field. If your faking something, it is a good idea to keep it out of focus. I also used my "true fill" light set at a really low intensity to keep the light ratio as dramatic as possible. (I hate to brag, but I’ll tell you more about my big 10" at another time.) At this point I’ll tell you a few studio tricks that the stylist did. The grill marks are put on one at a time from a metal bar that has been preheated over a flame on the stove. The direction on the grill marks were an issue of discussion relating to the overall composition of the shot. NOTHING in a shot like this just happens. The position of every little element, no mater how small, is there because we either wanted it there, or it was there because we couldn’t change it. But we knew it was there, and it had been discussed. The tuna and veggies were lightly oiled before the shot.
|
||||||
|
|