
Intro To Lighting for Food Photography
Lighting for food photography is a subject near and dear to my heart. To me, it is THE most important thing about commercial / advertising food photography. When you’re shooting ads or anything where’s there’s a team involved, you end up making compromises. This is also the case with food photography lighting, but not quite as often. Art Directors usually give the food photographer a direction or mood to go in and then it’s usually up the photographer. Anyone is likely to give an impression on composition, but usually people don’t know enough about lighting to give too much advice. And that’s a good thing… :o)
So here are some pointers about food photography lighting.
Food photography lighting is all about creating shape, texture and separation. It’s that simple, but at the same time, you’re trying to create a mood. Those goals sometimes don’t work together all that easily, but that’s the challenge.
Novice food photographers often ask me, “where do you put the lights?”, and my answer is “it depends…” There is no one setup that will work for every, or even most, food photographs. I do have a position for the lights where I like to begin, but that just allows me to be as flexible as possible, so that I can modify the setup as I see what’s happening on the set.
As a food photographer, you need to place your lights to accomplish four goals.
1. Create Shape
2. Create Texture
3. Create Separation
4. Create a mood.
Food Photography Lighting – Creating Shape
In food photography lighting, creating shape is all about light placement.
Whether you realize it now or not, one of your most important tasks as a photographer is to make that two-dimensional image (your photo) appear as three-dimensional as humanly possible. Lighting is you tool to accomplish that task and lighting for “shape” is what your need to accomplish that.
To simplify things, let’s assume that there are four different shapes in this world. There is a cube, a sphere, and a cylinder and a plane. (I’m not really sure that a plane is considered a shape, but bear (sp?) with me on that one…) Yes, I know, this is an oversimplification and there are a gazillion different shapes, but ,in general, most “food objects” can be shoved into one of these four categories. Fore example, a slice of lasagna would be considered a cube, a burrito, a cylinder, a meatball a sphere, and a pancake a plane. You get the idea…
If you have ever taken a drawing class, you’ll remember that there are classic ways of drawing these shapes, and therefor there are classic ways of lighting the same shapes.
Lighting a cube
With a cube for example, you need to illustrate to the viewer that there is a top, and two sides. The key is to make each of the three sides a different tone. Usually, a cube is lightest on top (because light usually comes from above) then the larger side (if there is one) is the second lightest side, and then she shorter side being the darkest of the three. If you sale to make the three sides different in tone, then you’ve failed to give the viewer the information to easily distinguish what they are seeing. The order of intensity of the three sides is not all that important, but the fact that they separate from each other, is important.
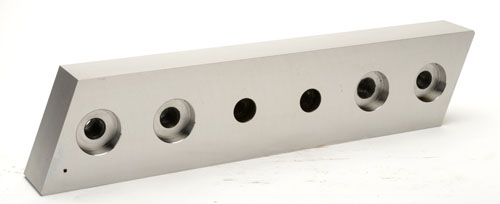
This is a shot I did just the other day for an industrial company. No, you’re right, it’s not food, but it does illustrate what you need to do when lighting for food photography, or anything else for that matter. Each of the visible planes should separate from each other. If you learn nothing else for this blog post, understand this one point.
Light Placement
So where do you place the light to active this separation of planes that causes shape to appear? It’s all trial and error and sometimes placing the light just an inch or two, one way or another, can make a huge difference. And the same holds true with lighting all the different shapes. You just have to play with it. (And that’s one of the really fun things there is about photography) Just keep in mind the goal! Your goal is to create shape by separating the planes of the object, and the “light” is your tool to accomplish that goal. Just remember though, you have other goals too, and we’ll talk about them later. If you look at your picture and the top of the food is the same tone as the side of the food and you can’t really see where one begins and the other ends, you need to move the light. It’s really that simple. (Not really, but it’s the beginning of understanding “how to light”) If you can understand the one thing about lighting (place he light where it causes the separation of the different planes of the subject) you’re well on your way to understanding the art of lighting food, or anything really.
Lighting multiple shapes
In most food photos, of course you’ll have many shops you ‘ll need to deal with. You might have a plate with a piece of lasagna, and a side dish of various shapes, and some bread off to the side. What do you do? The key is to choose the most important shape and light for that. Sometimes, it works out that you can light so that you get the desired shapes on all the elements of the food photo, but most of the times, you’ll need to light for the most important element and then compromise with the others.
Lighting a cylinder
The classic lighting setup for a cylinder is to light from the front, slightly off camera axis and then with a mirror or another light from the opposite rear. This setup is not something written in stone. Remember that you are just trying to illustrate shape. The key thing here is to make the transition in tones gradual, because a cylinder has how edge on its curved side. The idea is to make the tones of the cylinder gradually go “light, dark light” or “dark, light, dark”. The flat side of the cylinder (top?) also needs to separate from the curved side too, but since that us usually graduating “light, dark, light, this usually isn’t a problem.
Lighting a sphere
Basically, the same lighting idea goes for a sphere as goes for a cylinder. The idea is to make shape by lighting the object so that the shape goes light, dark, light. The big pain in the butt with lighting spheres is that since the sides protrude out from the bottom of the object, there is a large are that shows a cast shadow. Some people find this distracting and it’s difficult to control.
Lighting a plane
With a plane shape, usually a pancake or soup or something where you just see a surface, basically, the idea is to show as much texture as possible. We’ll talk more about shooting “planes” when we talk about lighting for texture. You’ll have to check back next week to get the next episode… :o)
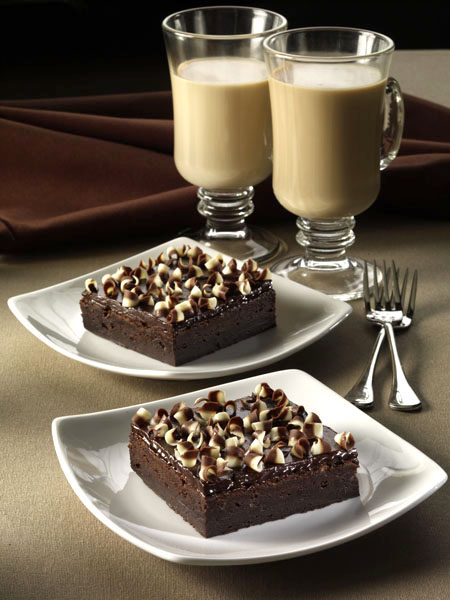
Brownies
Here’s a good example of a cube. The fact that the topping is different in texture, helped separate the top surface from the side surfaces, but notice how nicely the sides separate from each other. Without that separation, this food photo would be considered to be “flat”.
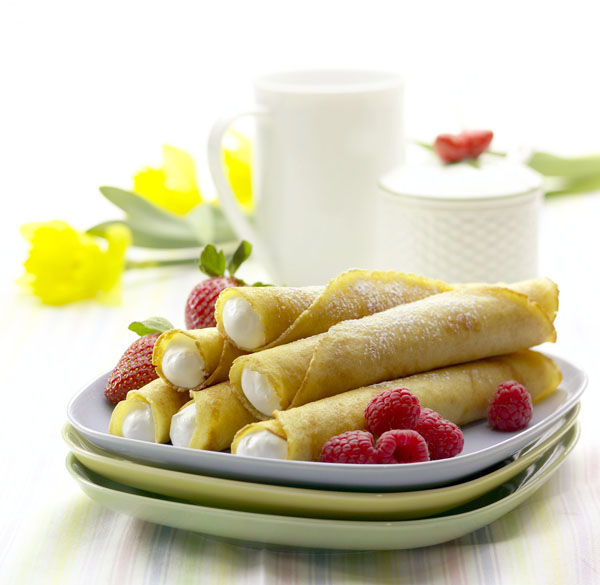
Crapes
This subject is obviously a cylinder. Notice hot the shape if displayed by graduating the light around the shape of the subject. It the crapes were standing up somehow, I would need to light more from the side to produce that shape.
Bread
I loaf of bread tends to resemble a sphere, which is usually best lit from above and from behind. The slices are more like a cube, so in this shot you have to compromise. Luckily, because of the drastically different color of the crust, the cut surface is easily “sides” of the bread separate easily.
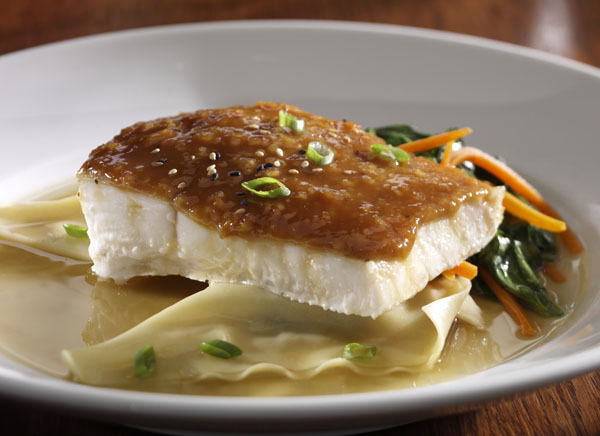
Fish
I love the lighting on this shot. There’s great texture and I love the pay you can see the curve of the top surface. Notice too the difference in tone between the front and side surface. I also love the edge of the dumpling thingy. You can see the tapered edge and how it graduates in thickness really well. Sweet!
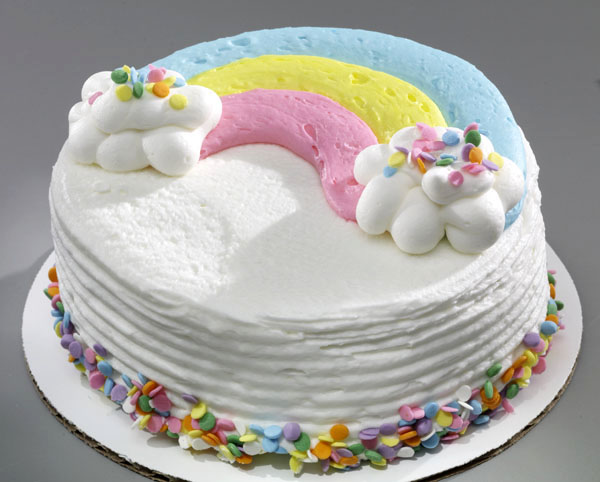
Ice Cream and Cake
See how the ice cream is edge lit and the front of the ball is a little dark. That’s what gives this a feeling of being a sphere. Also notice how the highlight on the icing of the cake separates the planes, top from side? As I remember it, that was a “happy accident” that I let remain.
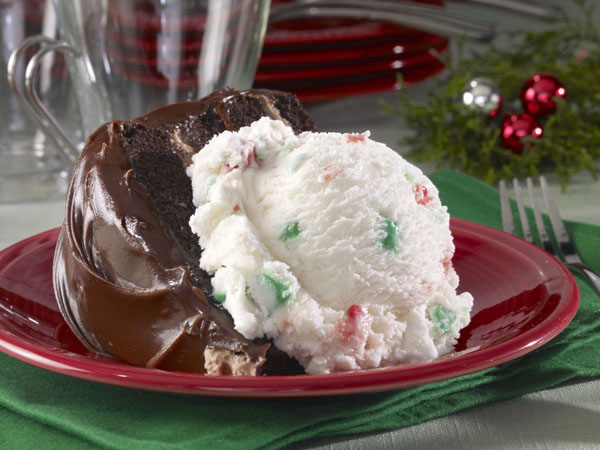
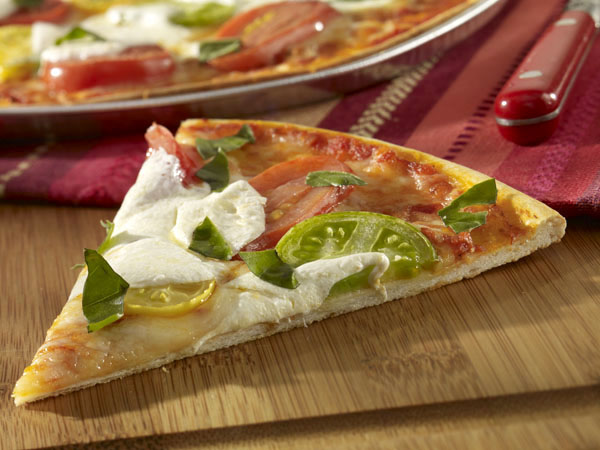
Pizza
Whenever you have a food item that is almost flat, I call that a plane. You do have to worry about the separation between top and side , but texture is the most important aspect of this kind or food photo.
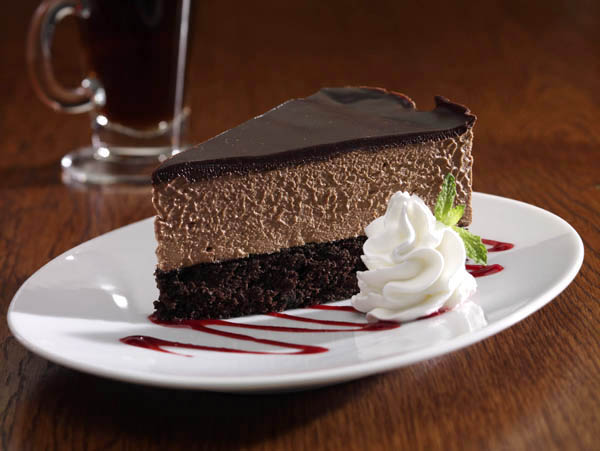
Cake Slice
I lit this piece cake differently than I usually do, because, as I remember, we didn’t like a highlight on the little crust shape of the cake. What I do like about this photo, is the separation of the top vs. side and the texture of the side surface. I was also able to get really good shape and texture on the little dollop of whipped cream. I have some funky cross-shadows going on, but if I didn’t tell you about them, you probably wouldn’t have noticed.
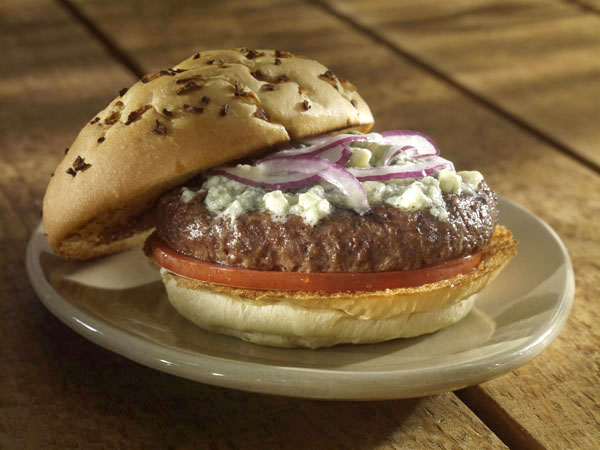
Burger
So what shape is a burger? With this one, the bun lid is almost a sphere (above and behind) and the burger and lower bun is almost a cylinder. (light / dark / Light). Nice job Mike! :o)
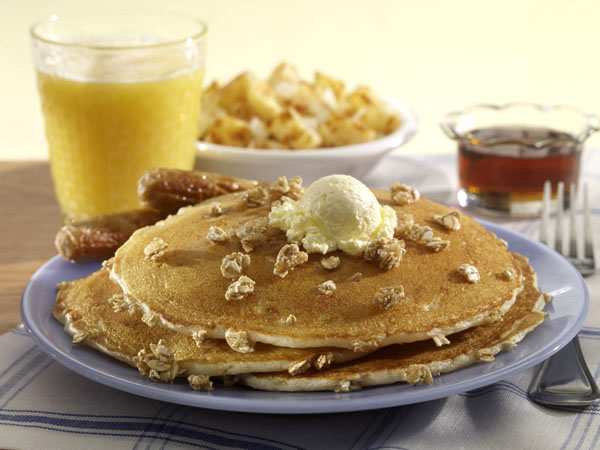
Pancakes
This shot has a little bit of everything… The pancake is a plane (mostly about texture) and orange juice is a cylinder (light / dark / Light), and the butter ball is almost a sphere (above and behind).
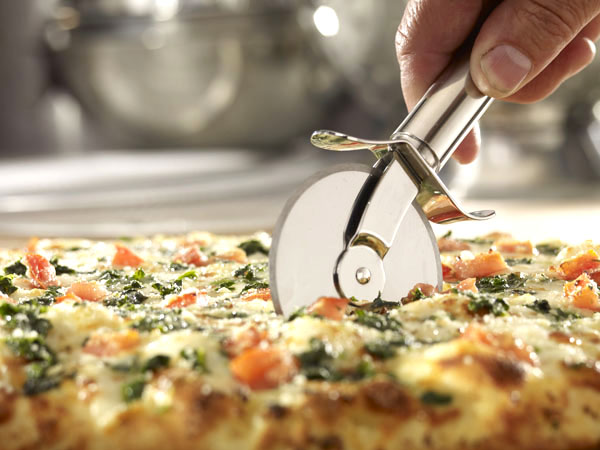
Pizza Cut
You really don’t see much of the sides of this food, so the texture of the top is all you get to show the shape, right? Not really… Look at the fingers. What shape are they? Lighting for shape just doesn’t apply to food. It applies to every photography subject.
Lighting for Food photography – Shape (Part II)
That’s it for today. Next week we’ll talk about lighting food for texture, which is one of my favorite topics. I think I light for texture better than most professional food photographers and I like to show off a bit…
Please come back again and leave me a comment if you like what you’ve read. Like me on facebook and feel free to tell me about all my typos. I like to write, but I hate to proofread. :o)
Thanks for viewing!
Hey! Please feel free to leave a comment if you have any questions. I’m here to share and I’m sure that some novice food photographers have questions about what I’ve said or what you’ve seen. Go ahead, do it! :o) And join the email list too!!!!!

Nice article!
Great post. Look forward to reading the next one.
Personally, I cannot thank you enough for such an informative and elaborate article on lighting and on food lighting in particular.
It did make a leap in my understanding of lighting tabletop in general too. I appreciate it a ton!
Great!!!!!!!!!!