
Food Photography Lighting – The Glare Light
In food photography, when you place a light at the “angle of refraction” from your camera, you can get some very interesting and useful effects. You end up with “glare”, or shine, or a reflection. Most novice food photographers try to eliminate reflections, but they can often do more good than bad.
When novice food photographers get together on a forum and talk about lighting, I usually hear them talk about the fill light and the main light, but rarely do I ever hear anyone mention lighting beyond those two lights. As a professional, I do take great care in placing those two lights, but the fact is, that’s just a very small portion of the food photography lighting process. Most professionals use supplementary lighting to help with various tasks such as creating texture, separation, and to create the desired mood of the photo. I want to talk about a light I use, that if you don’t already know about, will rock your world… :o) Okay, that might be an overstatement, but I think it will make a huge difference and help take your food photography lighting to “the next level”.
What is a food photography glare light
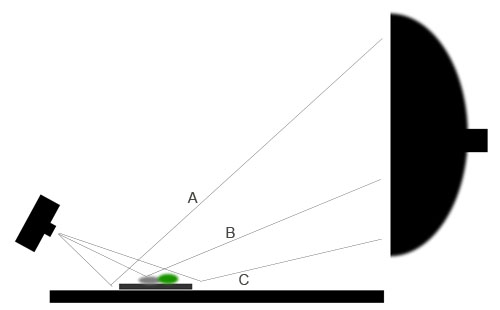
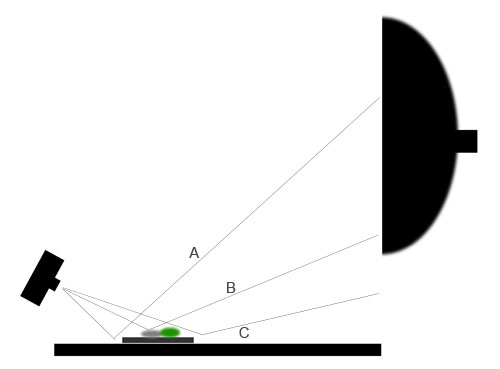
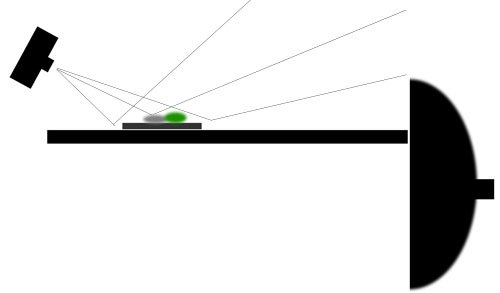
If you’ve already gone to the B&H web site and did a search for a “glare light”, you’ve probably come back empty-handed. When I say glare light, what I mean is a light I place off the end of my set, opposite the camera. (See illustration) This light serves to create reflections in most, if not all the elements of the set. It’s not to be confused with the “main light”, which gives shape and texture to the food. It’s a “extra” light, usually set at a relatively low power, that acts to simulate the environment beyond the set. For example, in your kitchen if you look down at your plate of food you will probably see the ceiling of your kitchen reflected in your butter knife, plate, and your glass of wine. That’s the function of the glare light, only with my glare light, I can control its intensity to serve various lighting purposes.
Here the glare light makes the plate look cool AND helps give shape to the food.
For my glare light, I use a large Chimera soft box, but you can use a reflector card or some type of light panel or maybe even a shoot-through umbrella. It doesn’t have to be a soft box. That’s what I have and it works well for me, but if you can figure something else that works for you, go for it. So, cancel the B&H order…In fact, in the past, I’ve used a frame of translucent material (shower curtain) with a light behind it to give me a graduated highlight, but to tell you the truth, this is a little too much of a pain in the butt for me. It works really well but it’s just a bit too time consuming.
The controls of the glare light
There are basically two ways to control the glare light. I guess the same thing is true with all photography lights, but I’ll talk about it anyway…
Glare Light placement
Many novice food photographers think that the light needs to go either to the left, right, above or behind or somewhere over there…. What they usually don’t seem to realize that just an inch or two can sometimes make a HUGE difference in the effect that the light creates. This is especially true with the glare light. Since the effect of the glare light is usually a reflection, just a wee bit of difference can make a major change in your shot. There may be times then you want to have a glare on only one portion of your set and you may need to move the light either up of down, or side to side just an inch or two, to place the reflection exactly where you want it without having it somewhere else. So placement is even more critical than with most other lights. You’ll really have to spend some time experimenting to get to know this light and understand its potential.
Glare light intensity
The intensity of the glare light is something you’ll have to play with on every shot. There will be times when you don’t even use it and there will be times when you use it so bright that it will overpower your main light. EXPERIMENT! This light is something that will create ”happy accidents” on a regular basis and keep an eye peeled for these. There will be times when you’ll think to yourself that the light is set to too high an intensity only later to look at the image and think it was your best shot. Play with this light. You won’t regret it.
What functions does the glare light preform?
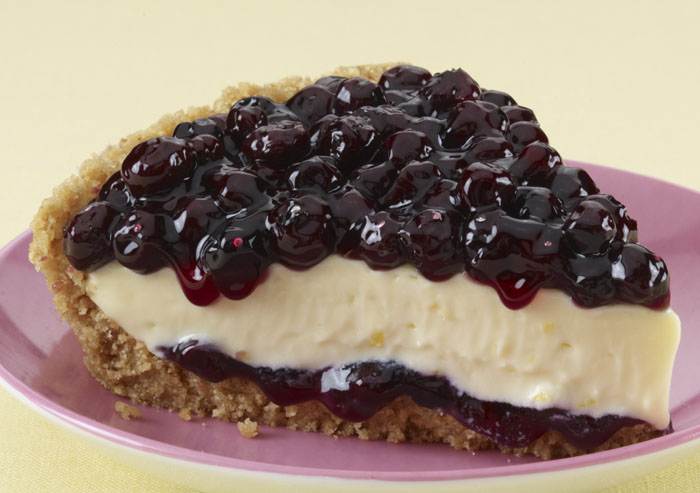
Show’s texture to smooth surfaced foods such as syrup and glazed pies – You really can’t shoot syrup without a glare light. Show me someone that’s done it successfully and I’ll tell you you’re crazy. :o) Pies or other glazed surfaced foods are great candidates for a glare lights too. Any food that is shiny will benefit from a glare light. WARNING! It’s really easy to over-do this. If you add too much glare to the tops of some foods, you rob them of all their color and richness, If you choose to do this for artistic reasons, that’s great. Just be careful it isn’t a mistake. It’s really easy to do. I know from experience… :o)
Adds tone to silverware – I hate black butter knives. They scream “shot in the studio” to me… God just didn’t make black butter knives and the only reason your butter knife appears black is because all the elements in your food photo are reflecting into your unlit studio (or kitchen).
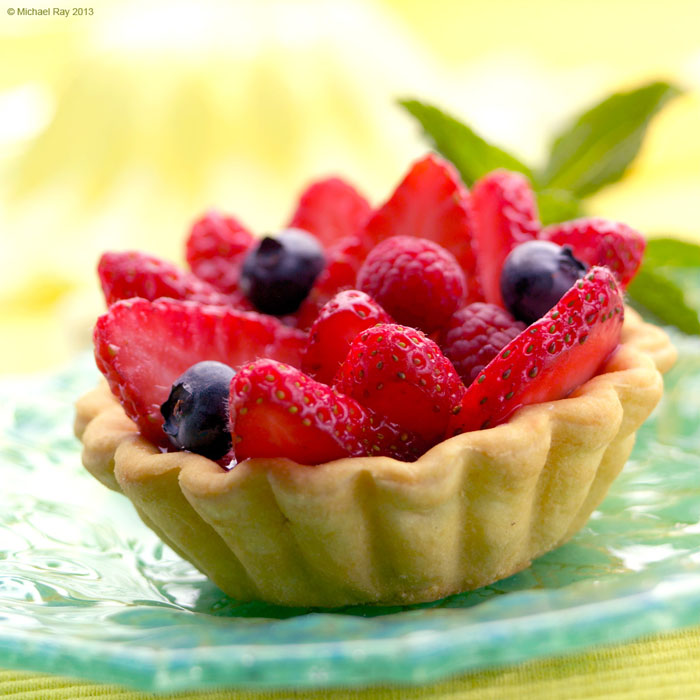
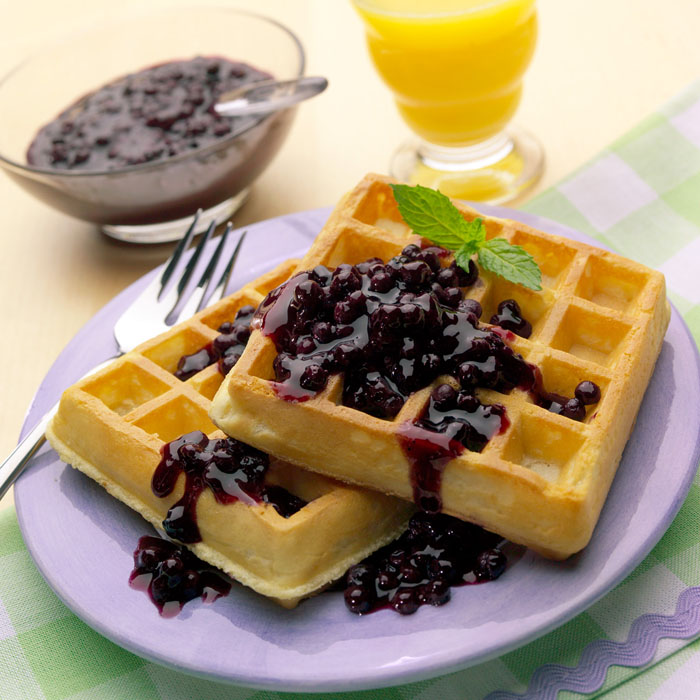
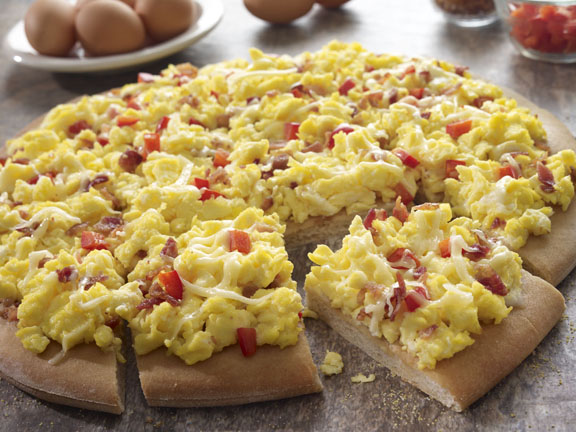
Adds life to the plate surface – You’ll be surprised to see what this light does to the reflections in your plates. At first, this may scare you a little, but after you get used to it, you’ll realize it’s a REALLY good thing. (Check out the sample food photos)
Helps hide shadows – Like I mentioned in my post on lighting for texture, I use a main light that casts a crisp shadow and the reflection of my glare light lessens the effect of these shadows.
Helps give a “light and airy” feel to a photo – If you’re looking for that light and airy feel, then you need to add this glare light. It “rounds out” all the shapes in your photo and just helps the photo look more natural.
Acts as an overall fill light – This light does act as a bit of a fill light and will affect the amount of other fill you will need for your shot. I just wanted to warn you about that. So If you get your main / fill light ration where you think you want it and then add a glare light, you’ll probably need to pull back on the amount of fill light to get back to your desired ratio…
- I often raise the glare light order to eliminate the reflection from the background, thus giving me a graduation in the background, while keeping the reflection on the plate, food and silverware.
Helps add interest by graduating the background – I often use this light to add a little shine to the foreground and then let the background of the photo go darker with lack of shine / glare. I think it adds some interest and helps maintain the richness of the background. This is especially helpful with rich looking wooden backgrounds.
Helps add tone to really dark food – So food, like chocolate for example, really sucks up the light. A glare light will often help. Try it. You end up lighting what the food is reflecting into rather than the food itself.
- In this food photo, you’re actually looking at the overhead fill light (placed farther back than normal) and the more intense “rim light” affect of the glare light.
Can be use to rim light shiny foods – I sometimes drop the glare light so low that it only lights the curved elements of the subject. (See pie sample food photos) The light doesn’t add any glare on anything in the photo except shiny things that are humped. Sounds a little weird, but looks really cool.
- If you lower the glare light to the point where you get no reflections anywhere in your shot and the light is intense enough, you can still get a rim light effect that looks really interesting. This is a good technique to help “blow out” the background.
Helps everything look natural – The more places light comes from, the more natural the shot will look. It’s that simple.
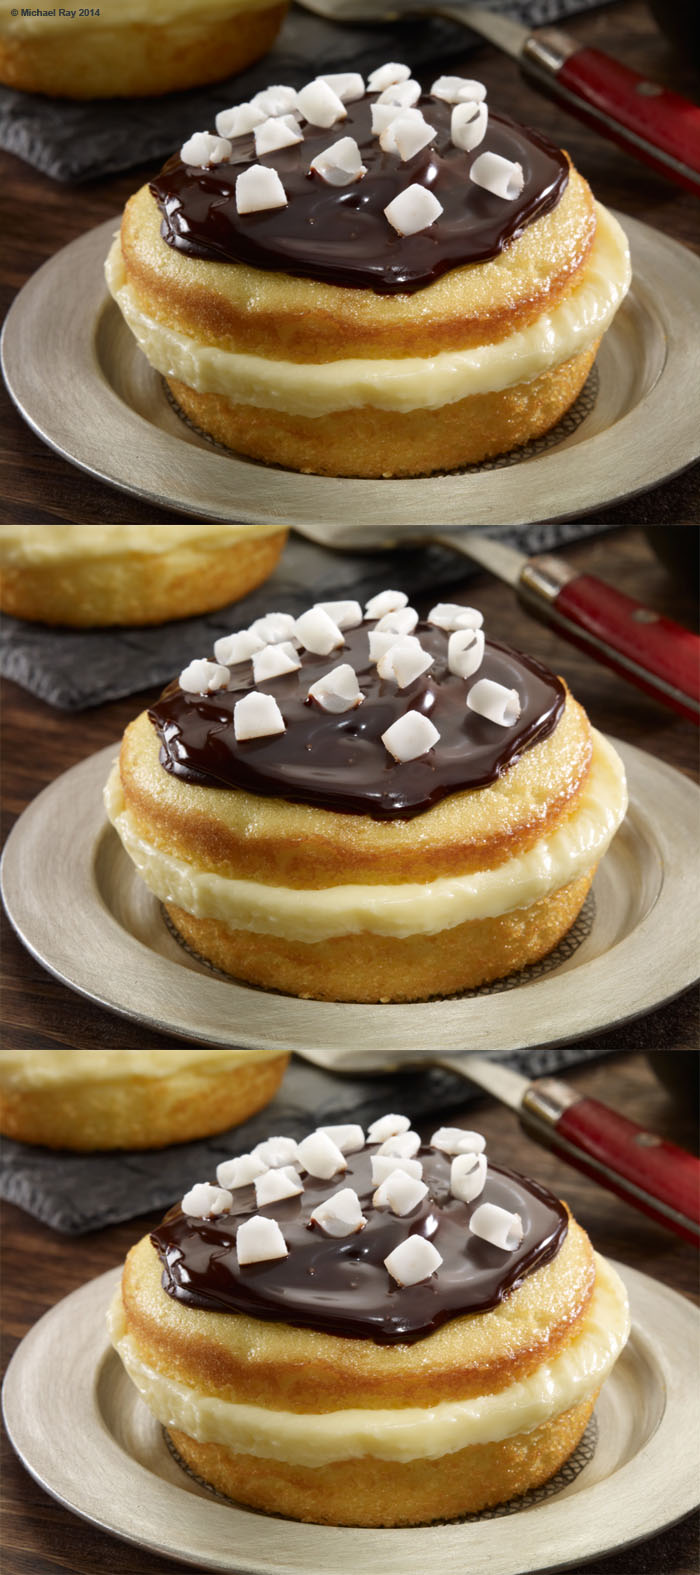
These food photos are a superb example of just what a difference a glare light can make. When I was shooting this, I was pretty happy with the first image and then thought I’d crank up the glare light just to see what it would do. I think that the second photo is better than the first and that the third beats them all.
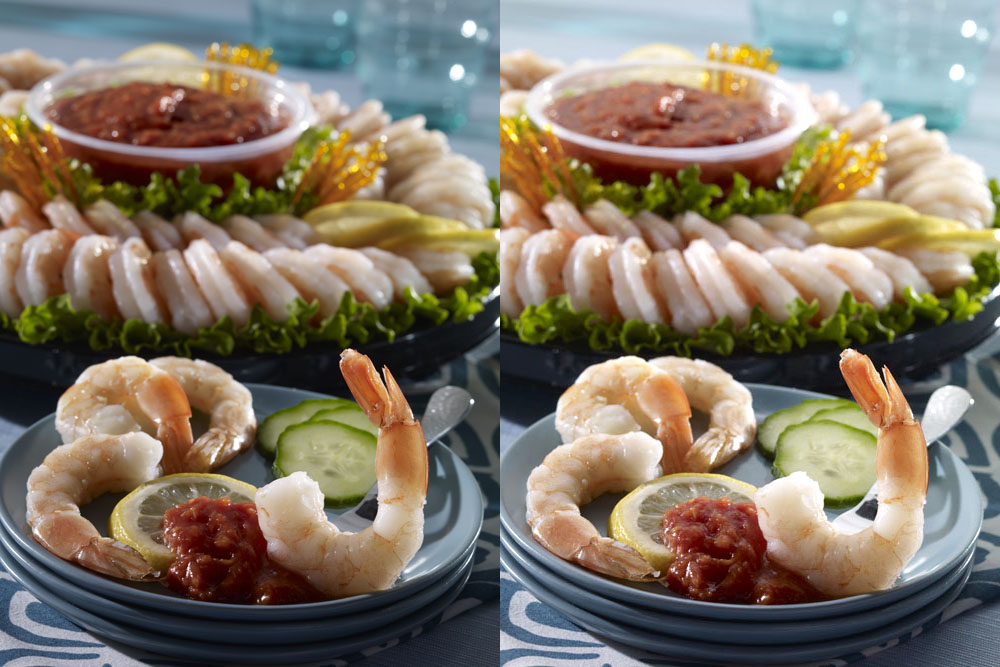
- Both of these shots had a glare light, but the one on the left wasn’t set at high enough power. If you ever want to make your shot look more “light and airy”, adding a glare light will help.
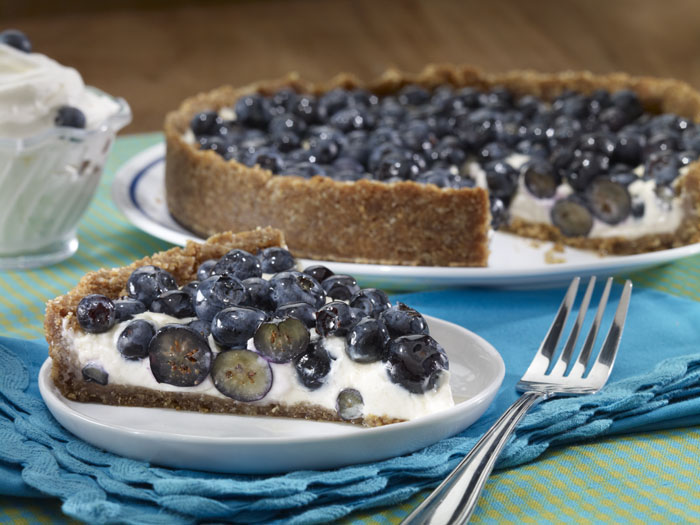
I think I might of gotten carried way with the glare light on this shot. The red of the tomato may be a little too washed out. I like the texture caused by the indentations, but not at the expense of the color.
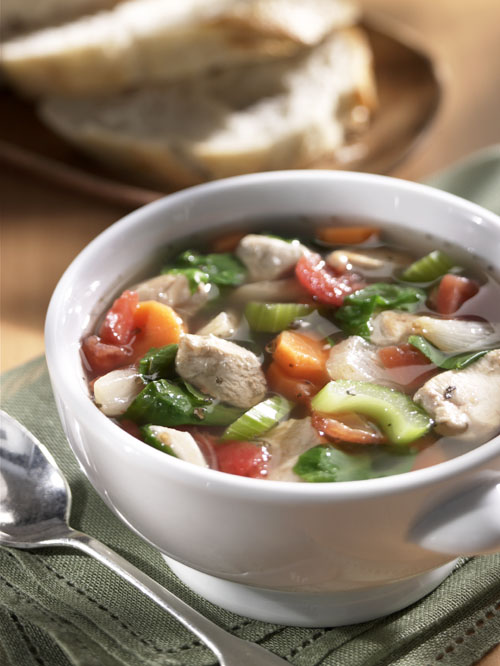
Notice how the graduation of the glare light happens from left to right, instead of front to back. This shows that the broth is there but also lets you see into the particulates
Notice how you can see the top surfaces of the liquid. This is done with the glare light. You need to have just the right amount of power in that light. Too bright, and it doesn’t work. To dark… You get the idea… :o)
Without a glare light, and subjects like this, you’d end up with black holes when the pie really is…
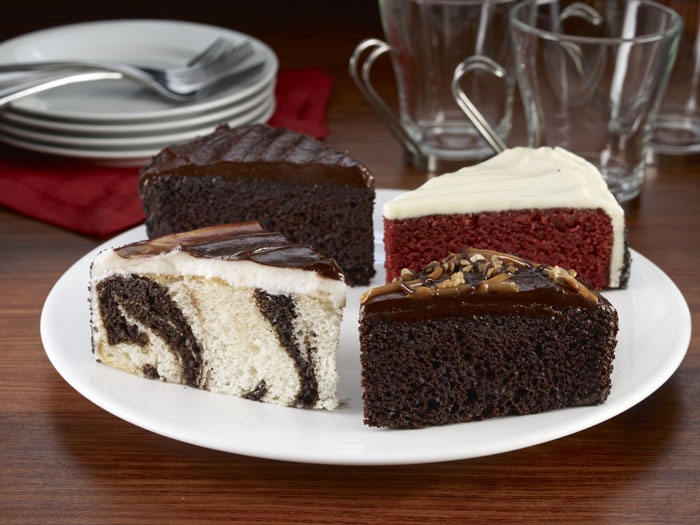
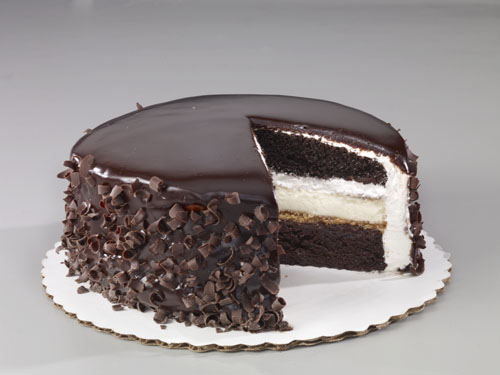
Notice how I used the glare light to graduate the background. Also, notice how the reflection on the icing helps give shape and definition to the cake.
Certain foods just suck up light and with shiny foods, you’re sometimes better off lighting what the food is reflecting into rather than lighting the food. That’s where the glare light comes in…

Syrup is one of those things that you want to use a glare light to show. That’s really the only way. With direct light only, it just doesn’t show up.
When lighting to create a reflection, you have to be really careful. I may have overdone it here… But maybe not.
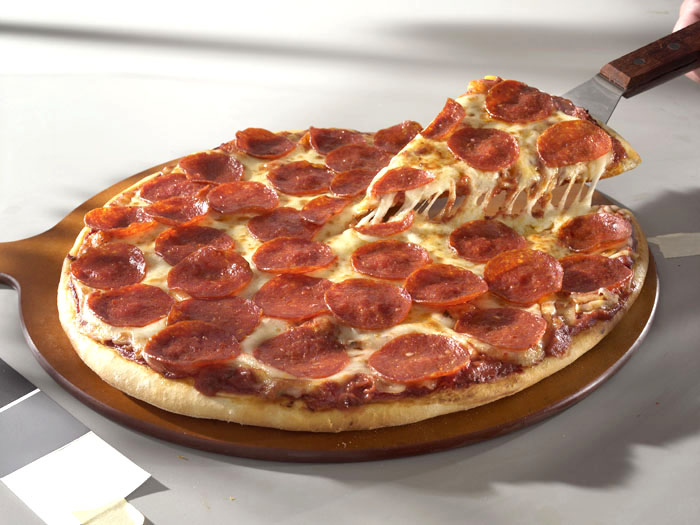
With a food like pizza, you don’t want to over glare the Pepperoni. It makes it look greasy.
You can over-do the glare light to give you a blown out, back lit affect.
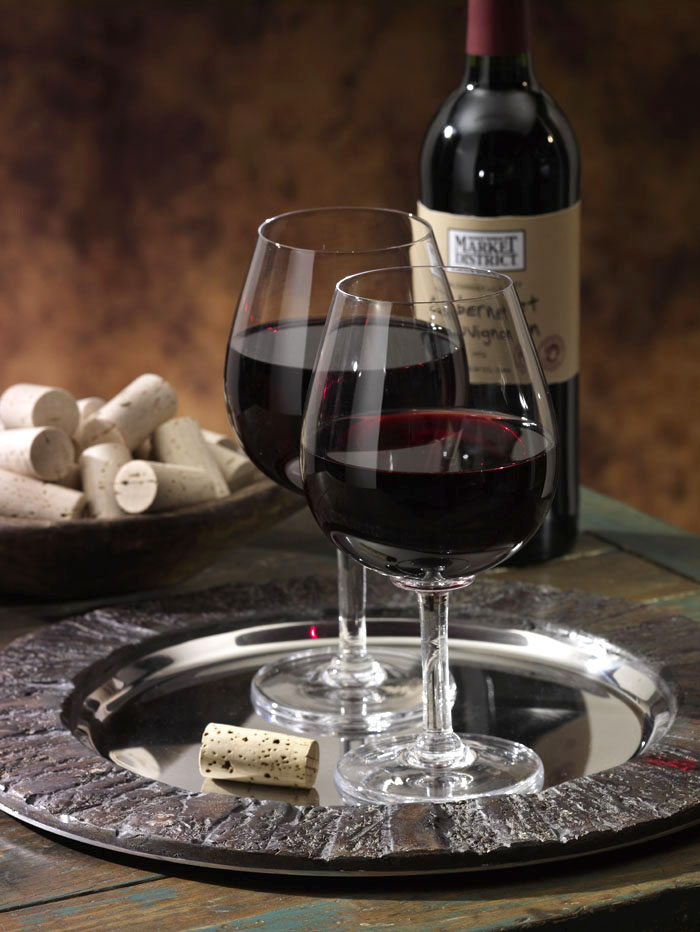
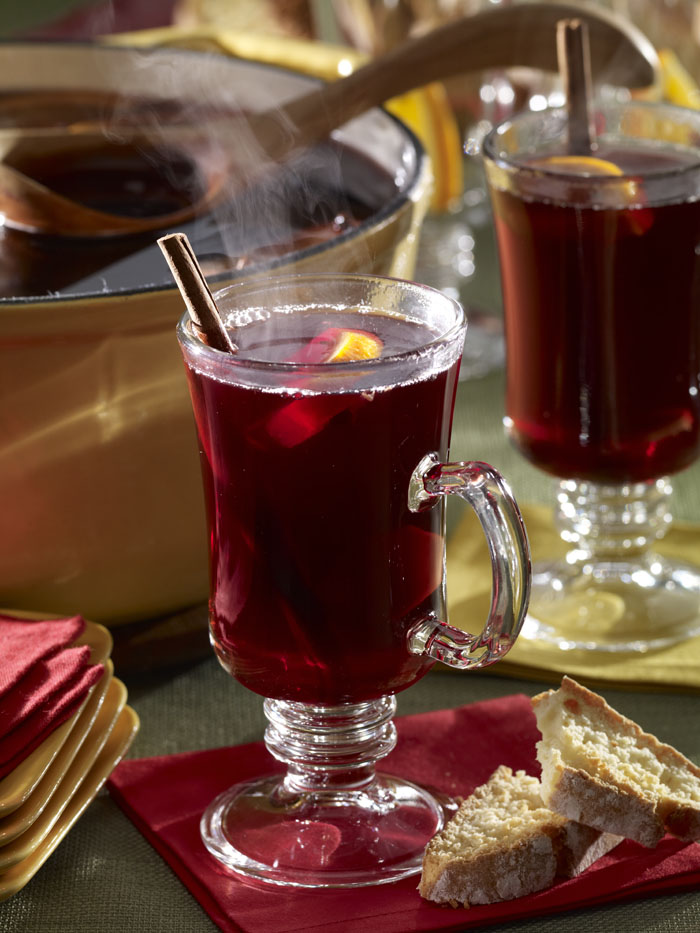
Checkout how I used the glare light to give dimension to the wine while keeping it off the background.
Here’s a great example of the glare light being used to graduate the background.
In conclusion…
I give you this challenge. If you start using a glare light and it doesn’t take your food photography lighting up at least two notches, then I’ll eat my hat. Just remember that to really learn how to use the food photography glare light, you have to experiment with it and please don’t be afraid to fail a time or two. It’s a learning process and after you master using this new light, you’ll wonder how you ever got along without it.
And as always, I’m sorry for all the typos and mistakes. Please feel free to contact me about any corrections I may need to make… I like to write but I hate to proofread. :o)

I really loved this article! It has really inspired me to experiment with this technique!
As always, great advice! Thanks Michael.
I asked you in another post about glare lighting. I guess I asked too soon! You explained it perfectly in this post. Thanks.