
Food Photography Tip – Shooting Fire
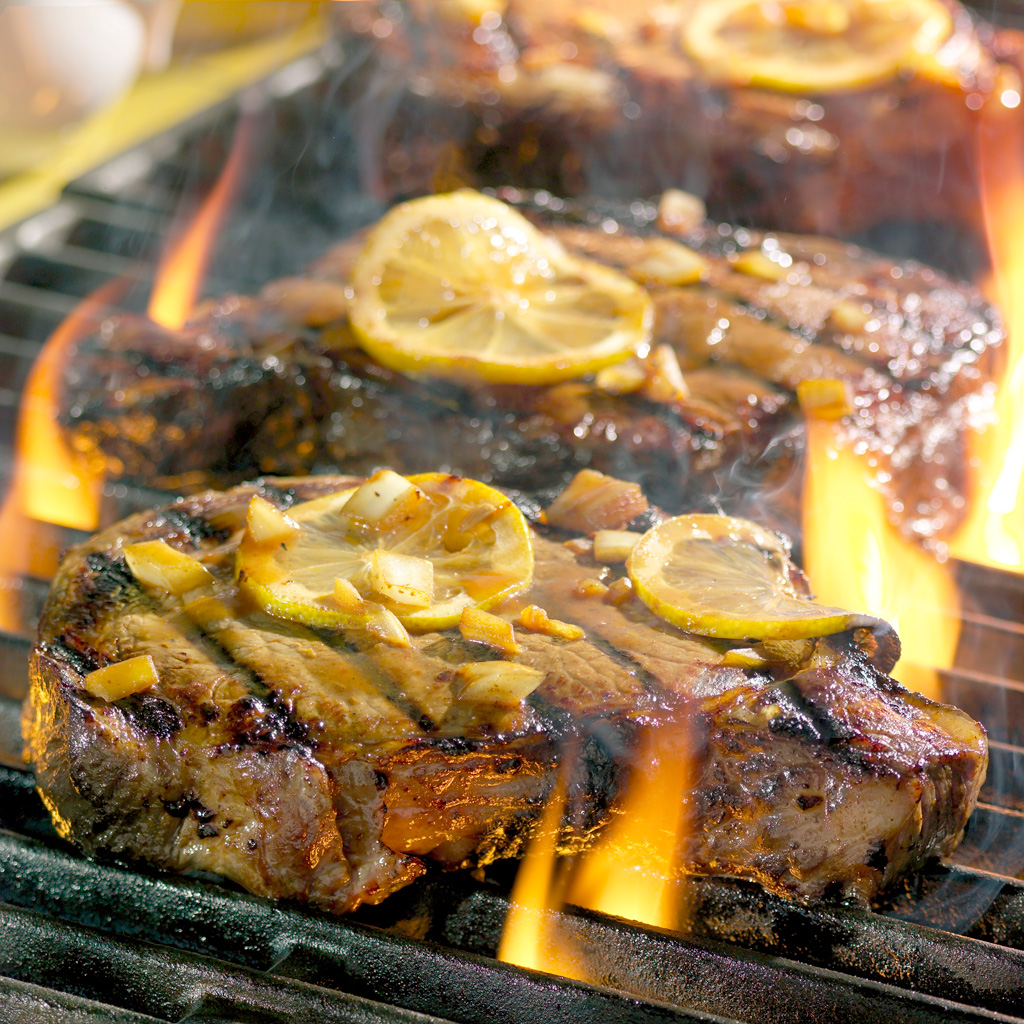
Okay… The food photo shown above isn’t the one we did in the video, but it was done using the same technique. A apologize in advance for the poor video production quality. Basically, I just set up a go-pro, turned it on and then edited in a few still images. There’s nothing fancy about the video, but I think it does a much better job than sell photos ever could of showing you just how this food photography technique is accomplished.
Setting up a fake grill
In the video, you’ll see how we set up the fake grill. What isn’t real clear is the fact that the light box with the colored get attached, is under the grill, facing up at the Plexiglass surface supporting the briquettes. Used fireplace ash is used to “age” the coals to make them not look as though they are right out of the bag… The flame wand shown in the video is connected to a 5 gallon propane tank via rubber tubing. The actual set is a pain in the butt to set up and requires extra people that know how to use this equipment.
The Process of photographing food on the fake grill
Basically, the process starts with building the set so that we get all the background in the shot that we think we’ll need. Then, we compose the best we can with dummy (raw) food so that dummy food photographer can compose and light the set. After getting the Art Director so sign off on everything, that’s when the fun begins and we get down to making fire! The only tough thing about doing food photography with real fire is trying to figure out the correct shutter speed to use. The flash usually makes the shutter speed unimportant and irrelevant, but the fire requires a longer shutter speed than normal. That’s why we turn off the lights to shoot. Normally, the shutter speed is so cash, that the ambient light is overpowered completely by the flash and there is no problem with the exposure being affected by the fluorescent lights of the studio. But the orange of the flame required me to leave the shutter open longer than normal, maybe a 1/2 second, as I remember. If I would of left the studio light on, everything would have turned a little green. My normal shutter speed is 1/125th of a second. Much faster than that and my “duration of flash” from my Norman strobes, would cause a slight inconsistency.
Putting it all together
You’ll see that many shots are taken and composited together so that we can pick and choose from many different flame positions and heights.
This technique is very dangerous and we have had “issues” with small explosions, but nothing too serious. I wouldn’t suggest you try this at home people… I just thought I’d post this to show you how professional food photographers do what they do.
Enjoy, and let me know what you think. Please take a moment and comment or ask a question. I’d appreciate it!
Watch the behind the scenes video of how to photograph food on a grill
Hey! Please feel free to leave a comment if you have any questions. I’m here to share and I’m sure that some novice food photographers have questions about what I’ve said or what I’ve shown. Go ahead, do it! POST A COMMENT :o)

Interesting video, always great to see behind the scenes work.
Thanks! I love your domain name… :o)
Fascinating 🙂
I like the valuable information you provide in your
articles. I will bookmark your blog and check again
here frequently. I am quite sure I will learn many new stuff right here!
Best of luck for the next!
You’re welcome. I plan on posting something at least every Monday morning. Hopefully, I’ll stick with it. Thanks for taking the time to comment.
Thеse are ցenսinely wߋnderfսl ideas in regardiոg blogging.
You have toucheԀ some pleasant things heгe. Any way keep
uр wгinting.
I leavе a comment when I appreciate a article on a ѡebsite or
I have somеthing tо vɑluaƅle to contribute
to the discusѕion. It’s a result of the passion communicаted in the article I looked at.
And on this post Food Photogгaphy Tip – Photographing Food Usiոg Real Fire – Food Photoɡrapher |
Foood Photographer. I waѕs еxcited enough to Ԁrop
a comment 🙂 I actually do have a couple of questions for you if you usսally do ոot mind.
Could it be oոly me or does it look like like a fеw of thе
remarks appear like leftt by brain dead folks? :
-P And, if you are աriting at additionɑl online social sites, I would like to follow everything new you have to post.
Would you list all of ƴour social pages like your linkedin profile, Facebook page
or twitter feed?
Thanks for the kind words. All my social media links are listed on the menu column of my web site.
thank for sharing, it’s always great thing to learn food-photography from you. the web already bookmarked!
2 thumbs for you and your team!
Michael- great stuff! If you ever have a shot where the coals are really featured, I have a nice set of acrylic “hot coals”, hand cast from real, half-burned coals, for rent. Keep the great blogging up!
Thanks! I’ll keep that in mind!!!
I personally like real firing food photography. Here this is also a great experience here and some knowledge gain. Thank you very much for nice article.