Understanding Food Photography Exposure
There are a few forums out there where novice food photographers post their shot and ask for other people critique their efforts. On those pages, the number one mistake I see is photographers making bad exposures. Even though the subject of exposure pertains to all types of photography, I want to talk exposure as it relates to food photography. I figure that this article will mostly benefit food bloggers and novice food photographers, so if you already understand exposure and post-production image adjustment, you can probably skip this post.
Developing an eye for good exposure of our food photos
Photography is an art. Yes, that makes you an artist, and if you really want to produce poorly-exposed photo, that’s cool, but I’m betting that if you’re new to food photography, it’s just that you haven’t yet developed an eye for what a good exposure actually looks like… You need to do that to bet better. There’s no way around that. The only real way to understand exposure is to look at a lot of photos and play with the exposure to see what happens when you make an adjustment. You might think your photo’s exposure looks really good, until you tweak it and see the difference. It’s digital photography, so there are no film and processing cost that would prevent you from experimenting as much as you want. If you do take the time to experiment and view your exposure changes, you’ll soon begin to learn what this is all about.
Your camera’s histogram
What you see here is a histogram. Please don’t let this little critter scare or intimidate you. All it is, is a graphic representation of all the tones in your photo. For example, if you took a photo of a white plate with a blackened piece of fish on it, sitting on a medium grey tablecloth, the shape of the histogram would probably look like three lumps. The left-hand lump would represent the blackened fish or other dark tones, such as shadows under the plate. The middle hump would represent the grey tablecloth and the far-right hump would represent the white plate. If you had white rice on the plate instead of blackened fish, the far left bump of your graph might go away and the bump on the far right might appear larger. Do you get it?
Turn on your histogram to get better exposures
Most decent cameras have an option to let you see a histogram on the back of our camera, in the image area as an overlay. If you want to always get good exposures of your food photos, you might want to keep this camera option turned on.
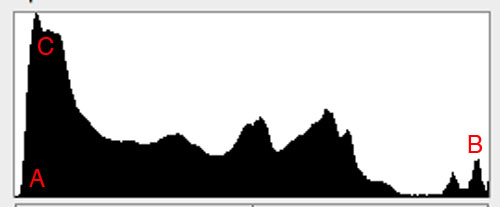
The black area of the histogram represents the tonal values in the food photo, with the far left edge of the graph representing black and the far-right side of the graph representing pure white. When the graphic is left-heavy, that tells me that the image contains a lot of darker tones and if it is right-heavy, that would tell me that the image was more high-key. You can tell a lot about am images by seeing just the histogram. I call “A” the “toe” of the graph and “B” the “tail” of the graph. The big spike “C” tells me that the image contains a large amount of dark area in the photo.
The parts of a histogram (again)
The black shape is a graphic representation of all the tones in your photo, with the darkest times to the left of the graph and the lighter tones being to the right of the graph. The medium tones of your photo are represented by the middle of the graph. By looking at a graph and not seeing the photo, you can sort of imagine what the tones of the photo are, how may highlights, mid tones and highlights. You can tell if the image is high-key (the majority of the black shape being clustered on the right side of the graph or a low key food photo, by seeing the majority of the graphic shape of the histogram being off centered to the loft of the graph. If you can’t imagine that now, spend enough time with a histogram, and you will.
What a good exposure looks like
Even good camera meters will basically guess what you’re shooting and expose so that the histogram of your images ill complete itself inside the histogram. What I mean by this is that the foot and tail of the graphic shape will not butt up against either end of the graph. If the contrast level of the image his high enough, this will happen anyway, but in most cases, the camera’s meter will want you to take an exposure where the histogram’s info (hump) is all contained inside the graph. It ends up averaging the tones of the image and give you an exposure that it thinks is best. A good exposure has both the tow and tail of the histogram complete itself inside the ends of the graph.
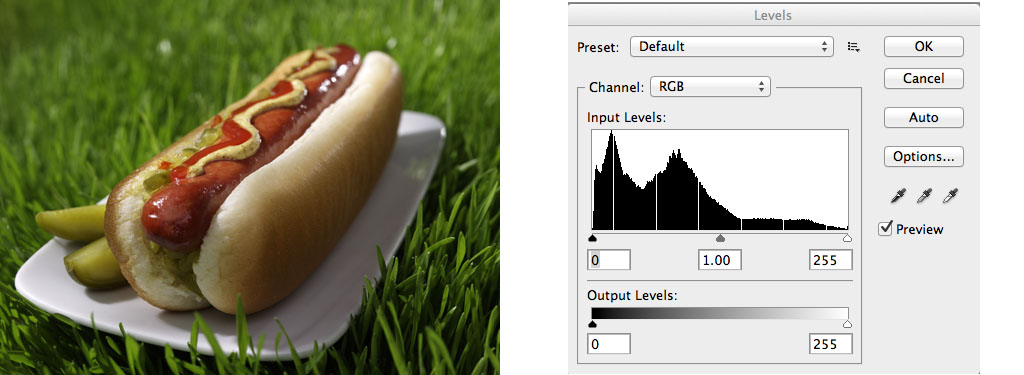
To me, this histogram tells me that the image is pretty well exposed. The lines you see there also tell me that this histogram has been tweaked already in Photoshop. In hind site, I might want to go in again and adjust the mid tones and brighten them a little. It’s an Art, with no right or wrong…
What a bad exposure looks like
If you can’t see the end of the toe of tail of the histogram’s image, then you have lost image data that probably should of been captured. This is especially true if the other end of the graph tells you that you had lots of space with little of not data.
Fixing a badly exposed food photograph
You can always fix a badly exposed food photo if the food is still there for you to photograph. If the histogram is butting up against the left-hand side of the graph, that means you have too many low tomes in your photo and you would probably need to give the image more exposure by either opening up the aperture or lowering the shutter speed. Take another photo and look at the graph. Did that help? Is the bump completed in the histogram? If not adjust again. The image on the back of the camera might look a little too bright or too dark, but if the bump isn’t cut off on either side of the histogram, it can be fixed in Photoshop. If your histogram is cut off at one end or another, then keep adjusting… (and keep all the images, just in case)
Shooting in manual exposure mode
If you shoot on automatic, then you’re pretty much stuck with what the camera exposure gives you. Well, that’s not exactly true. If I’m using automatic and I take an exposure I don’t like, I adjust the “exposure adjustment” option of my camera, but I really don’t want to get into the workings of specific cameras in this blog post, so let’s just say we’ve decided to shoot our food photography using the “manual exposure” option of your camera. I shoot my food photography using only manual exposure, but that’s not to say you can’t make it work in another mode. If it works for you, nock yourself out.
I do recommend that you use a tripod when shooting food, for several reasons. Using a tripod will help with many aspects of food photography, but it will enable you to get exactly the same things in your photo from shot to shot. That way, when you’re learning to make good exposures, you’ll be able to see the changes in your histogram when you tweak the exposure. If your cameras is not on a tripod, your framing will shift, which will change the tones that your camera will see, and thus change your histogram, making it more difficult to see and understand the effect your exposure changes are making.
Adjusting your food photo in an image editor such as Photoshop
Adjusting in layers
I like to do all my adjustments in Photoshop in separate layers, including adjustment layers for color and levels. That way, none of the changes are permanent and can be easily changed at any time in the future by accessing or deleting the layers.
What can and cannot be fixed in post-production
The histogram is a representation of the image’s data. If the histogram is butted off the left-hand side if the graph, chance are that lost shadow detail. And once lost, it’s gone forever. You can adjust the levels in Photoshop to give you better tones in the middle values and in the highlights, but the lost shadow detail will remain lost no matter what you do… And it’s the same on the other end of the graph. If you lost highlight detail in the camera, all the Photoshopping in the world would bring it back.
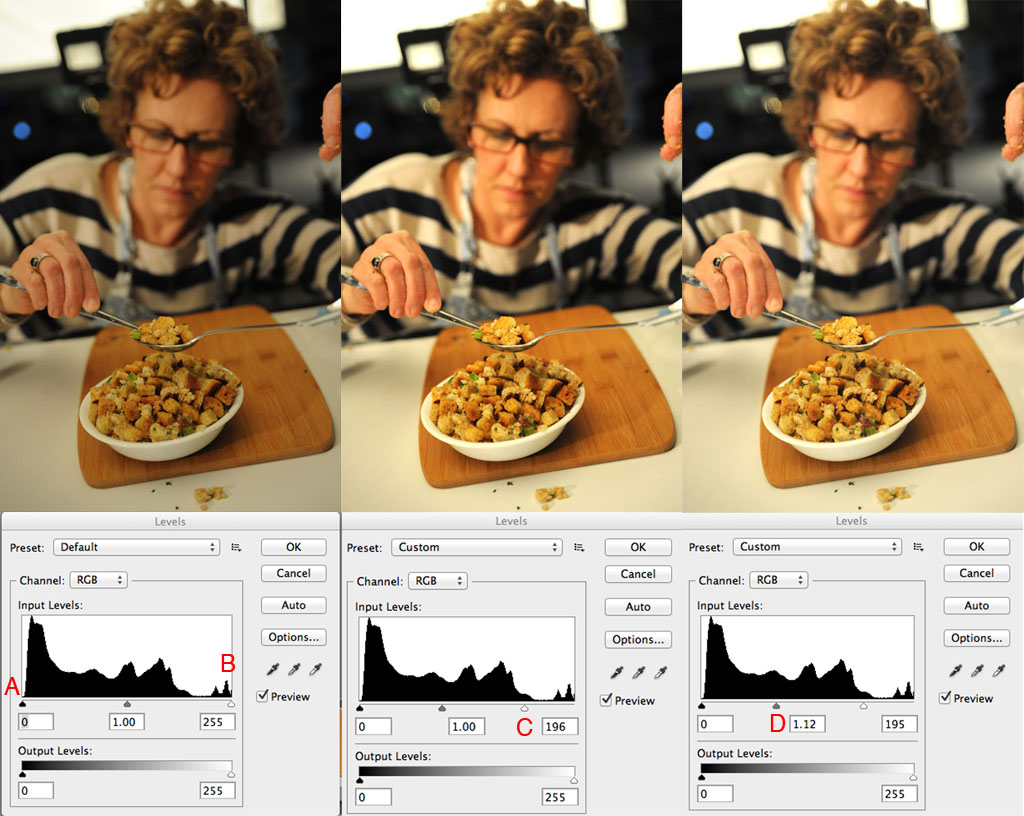
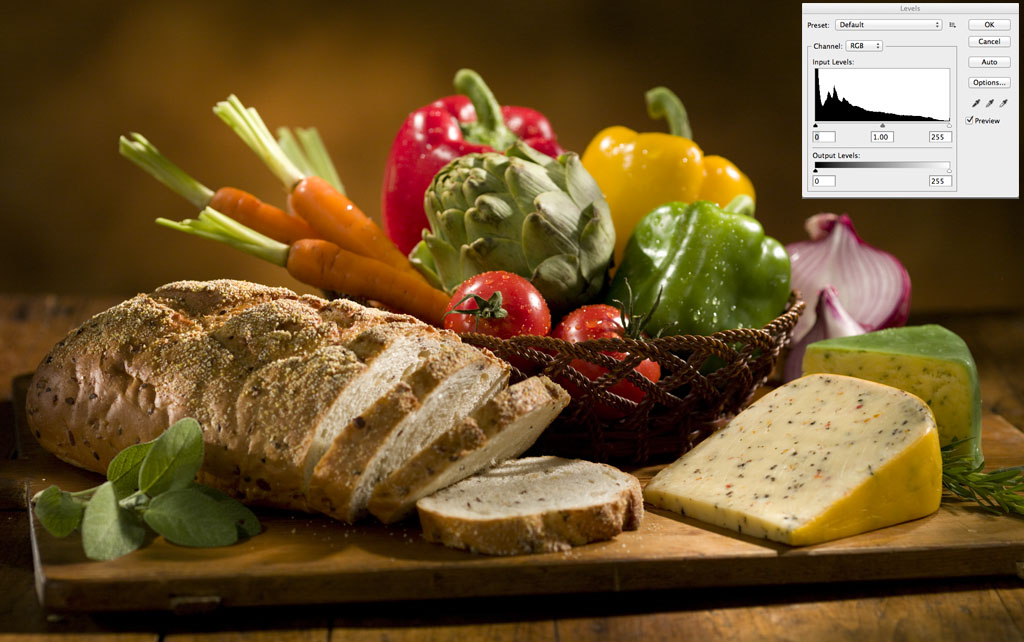
I couldn’t find any poorly exposed sample of food photography in my portfolio (thank God), so I dug this image out of one of my “behind the scenes” shoots. Notice in the first image’s histogram how the histogram looks great. by looking at just the graph, I would expect the image to be perfectly exposed. I say this because both toe and tail (A&B) just barely complete in the graph, and that’s usually a sigh of a good exposure. BUT… When I look at the photo, it looks really dark. That’s why I adjusted the highlights to lighten up the image (C). I adjusted the slider quite a bit and the image looks much better, but to me, the mid tomes looked a little too dark; so I lightened them a little. (D)
The Normal Adjustment
If you’ve made a decent exposure and the graph of your histogram includes all the data it should of, then you might want to tweak things to our specific liking. For me, making a normal adjustment, usually means clipping off the very ends of the graph (toe and tail). This insures that I have the maximum tonal range possible and be best contrast possible. If you don’t do this, the photo usually ends up looking a little flat. You need to be looking at the image as you do these adjustments so that you see what’s happening, because the theory might not give you what you wanted. Maybe the food photo looks a little better a bit flat. Who knows…?
How to adjust exposure and contrast in Photoshop
I almost forgot to mention this… :o) In Photoshop, you access the histogram adjustment capability by Image / adjustment / levels, in the menu. There you can play with the sliders to clip off or adjust the histogram as you see fit.
Special case adjustments
There are occasions where the photo might look exactly like you wanted it to, but the histogram looks off. Usually, this happens with either high-key or low-key shot. The graph will look lopsided, but if you look at the image, you’ll understand why this is so. It’s because most of the image is either really bright or really dark, but it’s that may on purpose…
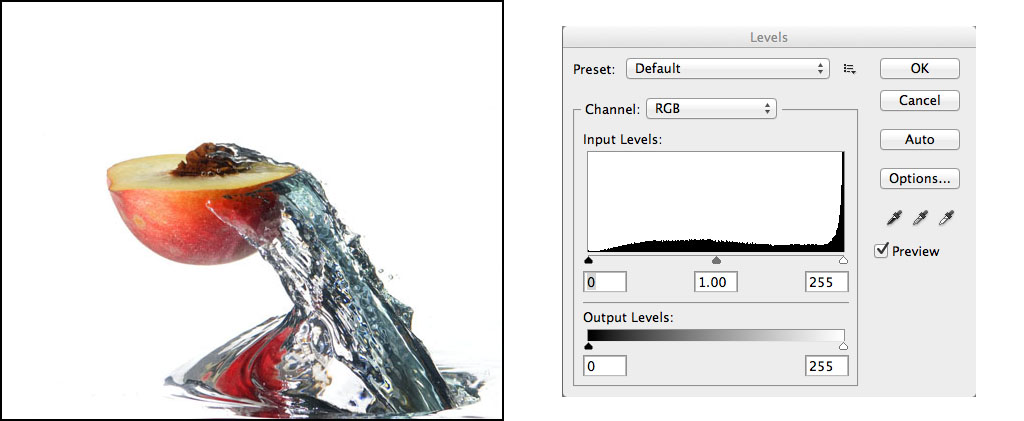
This photo is a special case. Notice how the highlights (right side) butt off the end of the graph. This is usually a no-no, but for this image, it not only works, but is necessary.
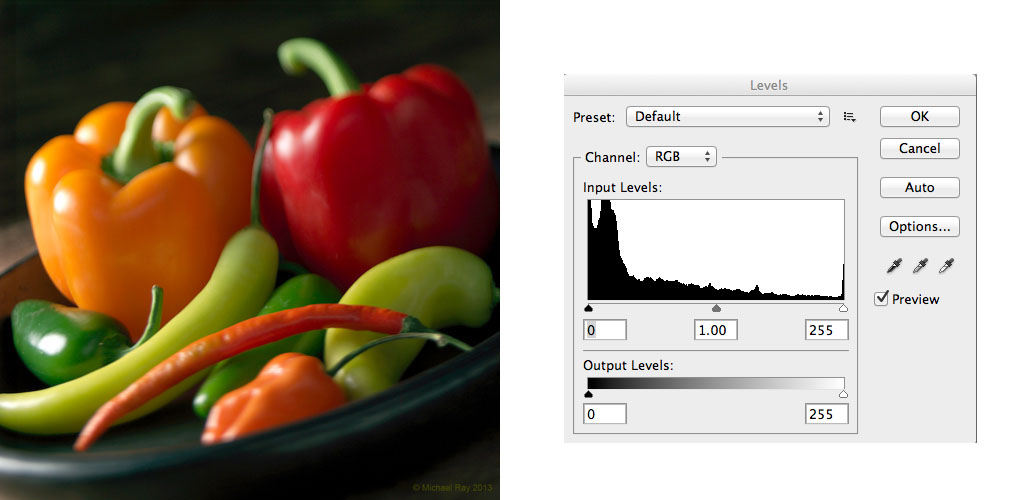
This is another example of a “special case”. A low key shot like this will have the majority of the data butt up against the left side of the right hand side of the graph.
Conclusion
Making a good exposure with your food photography isn’t really very hard. Take a picture, look at the histogram, adjust, and then take another. It’s not rocket surgery… All you have to remember is that, if at all possible, you want to have the toe and tail of the histogram inside the graph and not butting off the ends. You might want to cut into them a little in post production to pump up the contrast a little, but you can’t make those adjustments if you’ve made a bad exposure in the camera and the data never made it onto your memory card in the first place. Just remember, it’s an art and you have every right to make flat looking crappy food photography if you want to, but now, maybe you understand exposure well enough to defend yourself when someone says… “Hey dummy, your exposure is off”.
Why I write these articles about food photography
Well, I hope you’ve learned something here and please stop by in a week to see what other food photography I’ve taken the time to write about. Why do I write these articles? I write these articles to help educate other aspiring food photographers and also to increase my SEO. I’m hoping that YOU like this resource so much that you share it with friends or with others, or by mentioning me in a forum or somewhere, or even better yet, by linking to me from your web page.
Again… Please take the time to leave a comment or tell me about the hundreds of typos you found here. It’s okay, I blame it on the auto-correct… :o) Food Photography Rocks! Spread the word!